 |
LaTeXinIGOR A simple but hopefully useful utility for Igor Pro Users. Written by Jesús Martínez Blanco. updated: 8 April 2010 |
|||
|
Version HISTORY:
LaTeXinIGOR is an Igor PRO procedure for those Igor users in Windows who want to embed a LaTeX expression in their graphs, panels, layouts or notebooks. The expression is loaded as an Igor picture from an Enhanced Meta File image (EMF) generated by the program pstoedit, that converts the postscript output of the program LaTeX into a vectorial graph, or alternatively, from an Encapsulated PostScript (EPS) with a TIFF preview added by the program epstool (new in version 2.0). Although in Igor it is possible to insert equations in axis labels and annotations (see "Elaborate Annotations and Axis Labels" in the Igor help file Graphics.ihf), creating more elaborate mathematical, scientific, or engineering annotations involves subscripts, superscripts, changes of X and Y position and of font and style, using escape codes to do it, giving rise to a complicated and confusing code line. The main porpose of LaTeXinIGOR is to provide an easy way to insert mathematical expressions in Igor using LaTeX as the editor for a general Igor user under Windows operating system.
Optional:
The current version of LaTeXinIGOR is v2.1 since May 21st,, 2007. This is the list of new features in v2.0:
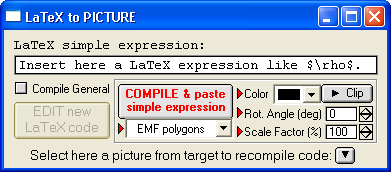
Downloading the last version of LaTeXinIGOR.ipf is as simple as clicking here. Once you load the procedure LaTeXinIGOR.ipf in your Igor experiment, just select menu "Macros->LaTeX to PICTURE". The following panel will appear:
Pasting a LaTeX expression: There are two input modes:
In this mode, the checkbox "Compile General" is unchecked and the input is taken from the text box in the panel. In this input box, you may introduce a simple LaTeX expression as you would type in a normal editor. For example, lets supose that you want to create the expression sinus of alpha divided by x square. Then you introduce the code $$\frac{\sin\alpha}{x^2}$$ in the text box. By pressing the button "Compile & paste simple expression", the procedure will paste in the target window the picture with the result of the compilation of the following LaTeX code: \documentclass[12pt]{article} Whatever you write in the input text box (in math or text mode) will be placed in between the line 7 and line 9 of the code above. The line 7 will change according to the selected Color in the color popup menu of the panel. The image can be also generated with a certain Angle of Rotation but once the picture is inserted, the color and the angle are fixed. You can only change the size (Scale Factor) by opening the drawing enviroment (ctrl+T) and double clicking the picture or dragging the corners. See the explanation of the button "Clip" in the next section. Since LaTeXinIGOR v2.0 it is possible to choose the output format for the picture. This is done with the popup menu below the main button. The possible formats are:
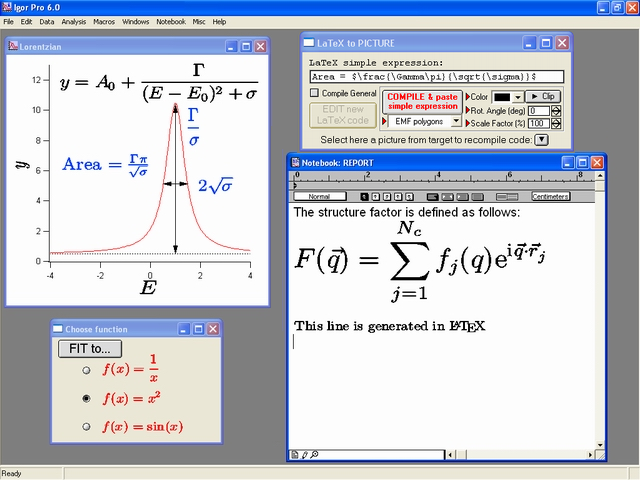
The possible target windows are those in which it is allowed to paste pictures in Igor, namely a Graph, a Layout, a Panel or a formatted text Notebook. A plain text Notebook doesn't support inclussion of pictures. In Graphs, Panels and Layouts, the picture will be placed in the up left corner. In Notebooks, it will be placed wherever the cursor is. You should know however that what you paste in a notebook is an independent object which is a copy of the picture generated by LaTeXinIGOR. The following figure shows some examples of expression embedding from LaTeXinIGOR.
All the pictures pasted with LaTeXinIGOR can be of course found in the menu "Misc->Pict" with the name latexpic_# (where # is a number increasing with every compilation), and eventually they can be selected and pasted in whatever other window without compiling again your LaTeX code.
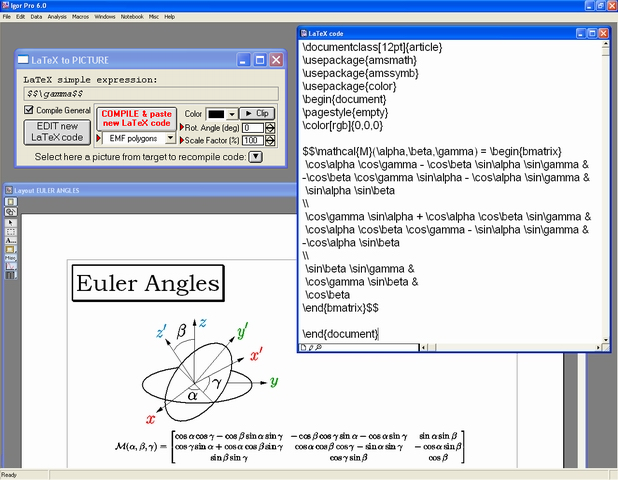
If you want to import a general LaTeX feature more complicated than a simple expression, or if you want to customize the text font using other LaTeX packages than those used in the simple code above, you can check the checkbox "Compile General". The button "EDIT new LaTeX code" will get enabled and you can edit a general LaTeX code. Note that the title of the button used to compile the code changed to "COMPILE & paste new LaTeX code", telling you the action that is about to be executed by pressing it. As an example, in the figure below, I create a Layout where I draw the schematics for the Euler Angles with the drawing enviroment of Igor. I use the panel in simple expression mode to insert the name of the axis in different colors. Then I check the checkbox "Compile General" to edit a general file where I generate the code for the matrix below the schematics. The title "Euler Angles" is just an Igor annotation. Note that what you compile now is what you write in the window "LaTeX code", therefore, the color popup control in the panel doesn't have any effect in this mode. But you can still use it to select a color. After selection, press the button "Clip" to put in the clipboard the LaTeX command that sets this color. You can then paste this command from the clipboard to the LaTeX editor. Note also that the LaTeX command "\pagestyle{empty}" will avoid having in the output file the page number of the postscript document, in such a way that the EMF or EPS picture will contain just the matrix.
Editing an existing LaTeX expression: By pressing the popup menu with the label "Select here a picture from target to recompile code", a list will appear with all the embedded pictures in the target window generated by LaTeXinIGOR. Place the mouse in an element of the list to see a green rectangle marking the position of the corresponding expression. In case that the selected item is an EPS picture, the green marker will exceed a bit the size of the picture in order to be seen, since the TIFF previews of the embedded EPS are opaque. Once you know the name of the picture with the expression you want to recompile, just select it and the LaTeX editor will appear with the source code that was used to generate the expression. Here you can modify the code and recompile it by pressing the button in the panel, whose name changed now to "RECOMPILE latexpic_#", where latexpic_# is the name of the selected picture. The expression will be updated after compilation. It is important to know that what you are updating is the picture itself as you would find it in the menu "Misc->Pict", which means that if you have several copies of the same picture in different windows, all of them will be updated. In the case of layouts, LaTeXinIGOR embeds a picture in the drawing enviroment. But you can manually paste a picture in the layout enviroment. This is done after hiding the drawing enviroment and pressing "Place Picture in Layout" within the menu "Misc->Pict". The expressions embedded in this way will also appear in the popup menu with the label "Select here a picture from target to recompile code", but they will not be marked by any green rectangle when you place the mouse on its name. Meaning of the small red triangles in the panel: This is a new feature in version 2.0 that helps the user to know which inputs in the panel will affect the result of a compilation. For example, when you compile a new general latex code, the selected color in the color popup is not taken into account, since what you are compiling is the code within the latex editor. In this case, no red triangle will mark the color menu. In the same way, when you are about to recompile an existing expression, you can shift before to another output format or you can change the angle of rotation, but you can not set the color with the popup (although you can still use the "clip" button) neither set the scale factor, since you are not pasting a new picture but updating an existing one. It is in my wish that the utility is user-friendly and robust enough so that a general user doesn't have to worry about how the procedure is working. If you are an Igor programmer and you want to change the code according to your particular needs, you should be able to follow the procedure just by looking to its code. Nevertheless, here I will comment some features that can be of your interest. The procedure itself is only calling external programs (latex, dvips and pstoedit or epstool) to generate the EMF or EPS file. Then it takes this file and pastes it as a picture in Igor. The sequence is performed in the function GeneratePICTURE. This function does the following things: |
||||
|
1. |
Checks whether the executables latex.exe, dvips.exe and pstoedit.exe (or epstool if the chosen format is EPS) are available by invoking another function called SetPathsforExec (explained at the end of this section). |
|||
|
2. |
Creates the source LaTeX file "formula.tex" either from the LaTeX editor (notebook) or from the input box in the panel. The file "formula.tex" is saved in the hard disk in the folder specified by an Igor path called LaTeXinIgor, which is a subfolder of the installation folder of Igor, namely \WaveMetrics\Igor Pro Folder\LaTeXinIgor\. This folder is used to save all the output files from the compilation of the .tex source LaTeX code. |
|||
|
3. |
If the chosen format was EPS and the angle of rotation is different than 0, an auxiliary LaTeX source "ROTformula.tex" is created in LaTeXInIGOR path. This code will be needed to rotate the resulting postscript of the first compilation, using this time the package "epsfig", that allows us to include the command: \epsfig{file=formula.ps,angle=angle} |
|||
|
4. |
Creates a BATCH file (.bat) to be executed in order to generate the EMF or EPS file, which will be also saved in the folder \WaveMetrics\Igor Pro Folder\LaTeXinIgor\. Before reaching that point, the program latex.exe has generated the .dvi file, and dvips.exe converted it to a .ps file. If the chosen format is "EMF polygons", the last line of the BATCH file executes pstoedit.exe with the following command: pstoedit -f emf -pta -dt -flat 0.0001 -rotate angle formula.ps formula.emf |
|||
|
Consult the website of pstoedit where you will find all the documentation. It will help you to change the code to use other modifiers in case the result doesn't satisfy you or you want to use the program for another porpose. Basically, what I do with the modifier "-f emf" is to select Enhance Meta File format for the output. The modifier "-pta" makes that each character of a text string is placed separately (avoids some font missalignments). The modifier "-dt" converts all fonts from the postscript file "formula.ps" into polygons, so that the metafile "formula.emf" doesn't depend on installation of fonts to display an expression. This could cause that the contours defining the symbols in your mathematical expression look like a sequence of lines rather than a smooth curve when you zoom a lot in. To minimize this effect it is possible to increase the density of polygons with the modifier "-flat 0.0001". The smaller this number is, the bigger is the density of polygons. Finally, "-rotate angle" rotates the output image. The value angle is provided programmatically by LaTeXinIGOR. In case the chosen format is "EMF fonts", the last line of the BATCH file executes pstoedit.exe with the same command as with "EMF polygons" but without "-dt" and "-flat" modifiers, to force pstoedit to use true type fonts instead of drawing the symbols with polygons. If the chosen format is EPS and the user decides to generate a rotated picture, latex must be executed again, with the code explained in the step 3. |
||||
|
5. |
Once this BATCH file is executed, the function reads the last line of the .log file generated by latex. If this line is "No pages of output.", the picture was not generated and therefore the execution will be aborted. |
|||
|
6. |
If everything was ok, the procedure loads the resulting EMF or EPS file as an Igor picture with the name latexpic_#, where # is a number increasing with every compilation so that you don't overwrite existing pictures in Igor. All the loaded pictures are accessible with the menu "Misc->Pict". The corresponding latex code is stored in the text wave root:LaTeXtoPICTURE:CodeStorage. |
|||
|
7. |
It happened to me that pasting the image just after it was generated with pstoedit, the picture looks cropped (something like 1 point in height and in width). In the begining I thought that pstoedit cuts somehow the output. But I realized that actually all the polygons are there because saving an Igor graph with one of these cropped pictures as EMF resulted in another EMF file without any cropping. The cause of this behaviour is unknown to me. But at least I got how to solve it. What I do is just pasting the output of pstoedit in a dummy window in Igor which is 1 point bigger than the original image in height and width, and I save it back as EMF again. The image is then reloaded ready to use in Igor. |
|||
|
Finally, LaTeXinIGOR looks for the most recent selected window which is suitable for incorporating a picture, and the expression is pasted there. This search is done with the function SuitableWindow. The possible target windows are a Graph, a Layout, a Panel or a formatted text Notebook. A plain text Notebook doesn't support inclussion of pictures. |
|||
|
When the user press by the first time the popup menu labelled with "Select here a picture from target to recompile code", LaTeXinIGOR creates a PNG picture consisting in a green square. The picture is called MarkerFrame and is generated in the function CreateMarkerFrame, that displays a dummy window, inserts the green square within the drawing enviroment, and saves the graph in the hard disk, to be loaded as an Igor picture. The popup menu with the list of embedded pictures is actually a panel with a hook function called PanelPicListHookFunction. The mouse coordinates are used to know which picture name is below the mouse, and the function ShowSelectedExpression pastes the green square in the ProgBack layer of the target window by executing those commands from the window recreation macro which affect the drawing enviroment (SetDrawEnv), and substituting the name of the selected picture by the name "MarkerFrame" within the command DrawPict. In this way, the user can know which picture or pictures (because there could be duplicated pictures) correspond with the name below the mouse coordinates. The most tricky part of the code is done in the penultimate function, called RewriteDefaultPath. As I explained before, the function SetPathsforExec sets paths where latex.exe, dvips.exe, pstoedit.exe and epstool.exe can be found. In case these files are not found, the function prompts for paths. To avoid being asked for these paths everytime the procedure is used in a new experiment within the same computer, the code lines ending with the text "<=DP LaTeX" and "<=DP pstoedit" or "<=DP epstool" (labels for statements to set the default paths) will be rewritten just after the first execution is finished. This selfwritting of the code in the procedure LaTeXinIGOR is done within the function RewriteDefaultPath with the command "Execute/P". Since it is not allowed to write in a procedure while Igor is executing something, the argument of "Execute/P" is posted to an operation queue. Items in the operation queue execute only when nothing else is happening. The operations sent to the queue are: to close the procedure LaTeXinIGOR, open it as a notebook, modify the text in the lines labelled by "<=DP LaTeX" and "<=DP pstoedit" or "<=DP epstool" to set the new default folders, close the notebook and open it back as a procedure. If you are an Igor programmer and you are about to modify the procedure LaTeXinIGOR, take into account that due to the way in which the lines specifying the default folders are searched, the order in which the functions RewriteDefaultPath and SetPathsforExec appear in the code should be respected, and also respect the labels "<=DP LaTeX", "<=DP pstoedit" and "<=DP epstool", that are used as keywords to look for these lines. The main porpose of writting this code was to facilitate the job of building figures in Igor which have to be used in LaTeX documents. Actually, I did this utility in the context of writting the PhD thesis (in Surface Science). I extensively used LaTeXinIgor for building the figures within. For downloading the pdf of my thesis, click here (Spanish). See my Curriculum Vitae in here. The procedure is posted as freeware in the hope that it will be useful, but without any warranty. I would be thankful for any suggestion, comment or bug fixing that could improve this code. You can contact me at jmb.jesus@gmail.com. I would like to thank to Victor Joco for his advice and computer support. Our conversations happened to be crucially clarifying and fruitful. This page was
visited
|
||||